Spring Boot 환경에서 vue 설치하여 사용하기
IDE : intellij
1. Spring 프로젝트를 만들자
[SpringBoot] intellij 에서 Gradle을 포함한 SpringBoot 프로젝트 만들기
상단 메뉴바 File > New > Project Gradle, Java 선택, Next 프로젝트 이름이랑 경로 지정 프로젝트에서 build.gradle에서 의존성 설정 plugins { id 'org.springframework.boot' version '2.5.0' id 'io.sprin..
mchch.tistory.com

2. VUE CLI를 설치하자
[Vue] vue.js 설치/실행, 싱글파일 컴포넌트
1. Node.js 설치 다운로드 | Node.js Node.js® is a JavaScript runtime built on Chrome's V8 JavaScript engine. nodejs.org 2. VUE CLI 전역설치 > npm install -g @vue/cli -g : 로컬 어디에서든 vue-cli를..
mchch.tistory.com
3. vue 프로젝트를 만들자
터미널에서 입력한다. > vue create '프로젝트이름'
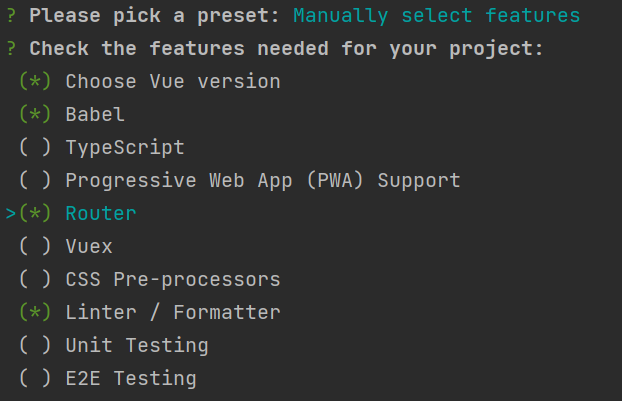
옵션들을 선택하게 된다.
프리셋 선택
Default 설치는 Router가 없다
Manually 설치는 Router를 설치할 수 있다.

Manually 설치를 선택하면 기능을 선택할 수 있다.
방향키로 움직이고 스페이스로 선택. Router를 넣었당
버전선택

모드 선택
Vue는 기본적으로 Hash 모드이며, History 모드로 사용할 것인지 선택하게 된다.
Hash 모드는 url 뒤에 #이 붙는다. History모드는 url뒤에 #이 붙지 않는다.

아직은 잘 모르니 n으로 가자..

Hash Mode와 History Mode 설명
[Vue] vue-router에서 Hash Mode Vs History Mode 차이점은 무엇인가?
들어가기 최근 Vue 를 사용하게 되면서 Hash Mode와 History Mode에 대해서 의문점을 가지게 되었습니다. Vue.js에 router 관련된 설정을 추가하면서 다음과 같은 설정에 직면하게 되었습니다. import Vue from
happy-coding-day.tistory.com
나머지 항목들도 잘 모르니 일단은 기본으로 선택했다.
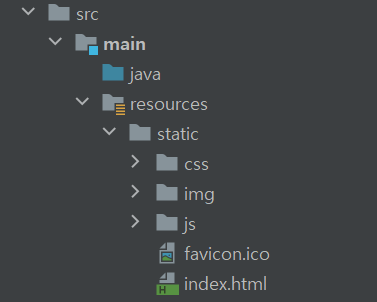
완료되면 디렉토리가 생긴당.

4. 뷰 프로젝트 설정
뷰 디렉토리 밑에 vue.config.js 파일을 생성한다.

파일 내용
module.exports = {
  //outputDir : npm run build로 빌드 시에 파일이 생성되는 위치
  outputDir: "../src/main/resources/static",
  //indexPath : index.html 파일이 생성될 위치
  indexPath: "../static/index.html",
  //SpringBoot 서버 접속 주소
  devServer: {
    proxy: "http://localhost:8080"
  },
  chainWebpack: config => {
    const svgRule = config.module.rule("svg");
    svgRule.uses.clear();
    svgRule.use("vue-svg-loader").loader("vue-svg-loader");
  }
};
5. 빌드
터미널에서 vue 프로젝트 디렉토리로 이동한 뒤에
> npm run build 입력
완료되니 resources 밑에 index.html과 소스들이 생겼다.
안생겼으면 껐다가 다시 열기
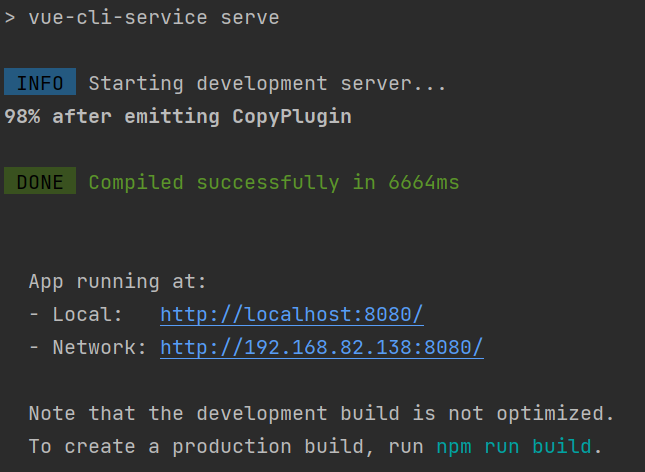
6. 실행
spring 을 실행하고
터미널에서 >npm run serve 를 입력하고 나면 완료된다.

'코딩 관련 > Spring 관련' 카테고리의 다른 글
| springboot H2 연동하기 / JPA 사용하기 (0) | 2023.01.27 |
|---|---|
| [Spring][Maven] maven 프로젝트 외부 라이브러리 추가하기 (0) | 2022.06.08 |
| [SpringBoot] intellij 에서 Gradle을 포함한 SpringBoot 프로젝트 만들기 (0) | 2021.09.07 |
| [SpringBoot] ** WARNING ** : Your ApplicationContext is unlikely to start due to a @ComponentScan of the default package. (0) | 2021.09.06 |
| [Spring Boot] -Dspring 사용, spring boot 환경설정 (0) | 2021.08.18 |