반응형

paste0을 사용합시다

paste0(문자열,문자열)

세 개 이상도 가능


반응형
반응형
pm2.5plot<-ggplot(tsv,aes(x=date,y=PM2.5, colour=기기이름,group=기기이름))+
  geom_line()+
  theme(legend.position="none", legend.box="vertical", axis.title.y=element_blank())+
  facet_wrap(~"PM2.5",ncol = 1,scales="free")


범례 제거하기

legend.position="none"


x축 라벨 제거하기

axis.title.x=element_blank()


y축 라벨 제거하기

axis.title.y=element_blank()

반응형
반응형

1. 프로젝트 폴더 내에서 로컬 repository 추가 

$ git init

결과) Initialized empty Git repository in D:/mtMap/.git/


2. git 원격저장소 설정

$ git remote add [remote이름]  [원격 repository url]

예시
$ git remote add mytest https://github.com/h92218/mytest.git


3. 원격저장소 설정한거 확인

$ git remote

결과) remote이름 표시됨


4. git에 올릴 파일 확인

$ git status

결과 ) 파일들 상태 표시 

5. 파일 추가

$ git add -A

-A는 모든 파일 추가임

다시 한번 git status로 확인해보면


6. 커밋하기

$ git commit -m "message"


7. 푸시하기

$ git push [remote 이름]

예시
$ git push mytest


fatal: The current branch main has no upstream branch.
To push the current branch and set the remote as upstream, use

    git push --set-upstream mt main

근데 아마 최초 푸시면 upstream으로 하라는 문구가 뜰 것.

해주면 됨.

$ git push --set-upstream mt main

Git global setup : 깃 전체 설정입니다~

git config --global user.name "userName"
git config --global user.email "userName@gmail.com"

Create a new repository : 레포지토리를 새로 생성하고 업로드하는 경우입니다~

git clone http://git 레포지토리 주소~~
git switch -c main
touch README.md
git add README.md
git commit -m "add README"
git push -u origin main

Push an existing folder : 레포지토리는 존재하고 git 업로드를 최초로 하는 경우입니다.

git init --initial-branch=main
git remote add origin http://git레포지토리주소~
git add .
git commit -m "Initial commit"
git push -u origin main


Push an existing Git repository : 사용하던 레포지토리에서 다른 레포지토리로 전환하여 업로드하는 경우

git remote rename origin old-origin
git remote add origin http://git레포지토리주소
git push -u origin --all
git push -u origin --tags


github에서 git repository 폴더 화살표 / 디렉토리 화살표 오류 


GitHub(깃허브) - 디렉토리에 화살표 표시(폴더 클릭이 안될 때)

📎 GitHub 디렉토리 화살표 표시 -> 폴더 접근 불가능 깃허브에서 한 디렉토리에 다른 디렉토리를 추가하는 도중 위와 같이 디렉토리에 화살표 표시가 생기고, 디렉토리에 접근이 되지않는 문제

zzang9ha.tistory.com


CRLF will be replaced error


Git 에러 CRLF will be replaced by LF (혹은 반대) 핸들링하는 방법

맥/리눅스 이용 개발자와 윈도우 개발자가 협업할 때 왜 발생할까? 터미널에 git 명령어를 입력했는데 다음과 같은 에러가 뜨는 경우가 있다: ```bash warning: CRLF will be replaced by LF in some/file

blog.jaeyoon.io

git config --global core.autocrlf true


non-fast-forward 에러

$ git push -u project master
To http://00.000.0.000:8090/project.git
 ! [rejected]        master -> master (non-fast-forward)
error: failed to push some refs to 'http://00.000.0.000:8090/project.git'
hint: Updates were rejected because the tip of your current branch is behind
hint: its remote counterpart. Integrate the remote changes (e.g.
hint: 'git pull ...') before pushing again.
hint: See the 'Note about fast-forwards' in 'git push --help' for details.

원격 분기의 변경 내용을 로컬로 변경한 내용과 페치하고 병합하여 이 문제를 해결할 수 있습니다.

$ git fetch origin
# Fetches updates made to an online repository
$ git merge origin YOUR_BRANCH_NAME
# Merges updates made online with your local work

또는 두 명령을 한 번에 모두 수행하는 데만 git pull을 사용할 수 있습니다.

$ git pull origin YOUR_BRANCH_NAME
# Grabs online updates and merges them with your local work

참고

https://docs.github.com/ko/get-started/using-git/dealing-with-non-fast-forward-errors


fatal: refusing to merge unrelated histories

git pull origin mybranch --allow-unrelated-histories

이 명령 옵션은 이미 존재하는 두 프로젝트의 기록(history)을 저장하는 드문 상황에 사용된다고 한다. 즉, git에서는 서로 관련 기록이 없는 이질적인 두 프로젝트를 병합할 때 기본적으로 거부하는데, 이것을 허용해 주는 것이다.

참고

https://gdtbgl93.tistory.com/63


 Already up to date

alreay up to date 라면서 pull 안 될 때

$ git fetch --all
$ git reset --hard origin/master


git reset :  HEAD의 포인터를 특정 위치로 옮기는 명령어
--hard 옵션 :  이전 커밋으로 돌아가기. 그 커밋 이후에 내용들은 삭제됨.
--mixed 옵션 : 커밋을 이동함. 변경 이력이 모두 삭제되지만 스테이지에 코드가 남아있음. 이 코드를 add 후 커밋하면 됨.
--soft 옵션 :  mixed 옵션과 같지만 이미 스테이징 되어있음. 이 말은, add 없이 바로 커밋하면 된다~~
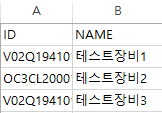
https://chanos.tistory.com/entry/GIT-git-pull-%EC%8B%9C-merge-%EC%98%A4%EB%A5%98-%EB%B0%9C%EC%83%9D%ED%96%88%EC%9D%84-%EB%95%8C-%EA%B0%95%EC%A0%9C%EB%A1%9C-%EB%8D%AE%EC%96%B4%EC%93%B0%EB%8A%94-%EB%B0%A9%EB%B2%95-git-fetch-reset-pull

반응형
반응형

yum 으로 패키지 설치 시 

packages excluded due to repository priority protections  에러


priorities plugin 때문이라는데..

/etc/yum/pluginconf.d/priorities.conf 파일의 내용을

enabled = 0 으로 수정해주면 된다. 

반응형
반응형
Error in as.POSIXct.numeric(tsv$date, format = "%Y%m%d") : 'origin'이 반드시 주어져야 합니다

숫자가 character 타입이라 그렇다

숫자를 날짜로 변경할 땐

숫자를 character 타입으로 변경하고 나서 날짜 타입으로 변경하자~! 

tsv$date <- as.character(tsv$date)

음~ 해결~

반응형
반응형

git clone으로 내려받은 프로젝트를

내 repository 에 올리고 싶었음

vscode 사용


1. 내 github에서 새 repository 생성 및 주소 복사

2. 터미널에서 remote url 확인

명령어 : git remote -v

3. remote 주소 변경

명령어 : git remote set -url origin "repository 주소"

주소 변경뒤 다시 git remote -v로 확인하면 바뀌어 있음!


4. push로 프로젝트를 업로드 해준다

명령어 : git push


반응형
반응형

VSCode에서 Tomcat for JAVA 플러그인 설치하고 실행하려고 하니까 

[apache-tomcat-9.0.37]: 'C:\Program' is not recognized as an internal or external command,
operable program or batch file.

에러가 자꾸 뜨는거..

심지어 한글은 자꾸 깨져서 짜증..

settings.json 파일에

"java.home""C:/Program Files/Java/jdk1.8.0_281"  경로를

"java.home""C:/Java/jdk1.8.0_281" 로 바꿔주거나

그 라인을 주석처리하면 된다...

띄어쓰기 때문에 Program만 쳐 인식 했나봄 짜증


반응형
반응형

데이터는 다음과 같다. CSV로 저장하였음

데이터1 ) ID와 데이터가 있는 data.CSV
데이터2 ) ID와 NAME이 있는 model.CSV 


1. 파일 읽어들이기

###### 첫 번째 파일 읽기 ######
setwd("C:/Users/USER/Desktop")
tsv <-fread("data.csv")


###### 두 번째 파일 읽기 ######
setwd("C:/Users/USER/Desktop")
NAME <-fread("model.csv")


2. 두 데이터 합치기 merge

MergeTsv <- merge(tsv,NAME,by="ID",all=FALSE)


all 옵션 : 

all=TRUE 일때는 합집합(좌)

all=FALSE 일때는 교집합(우)


3. 데이터 타입 변환

MergeTsv$DATA <- as.numeric(MergeTsv$DATA)

############### POSIX 타입으로 변환하는 경우####################
MergeTsv$REG_DATE <- as.POSIXct(MergeTsv$REG_DATE,format="%H:%M:%S")

############### %H:%M 처럼 변환 형태를 지정하는 경우 format 이용####################
############### format을 이용하면 CHAR 타입으로 변환이 된다....####################
MergeTsv$REG_DATE<-format(as.POSIXct(MergeTsv$REG_DATE,format = "%H:%M:%S"),"%H:%M")


4. ggplot 이용하여 꺾은선 그래프 그리기

//x=축 데이터, y=y축 데이터, colour, group = 구분 기준
ggplot(MergeTsv,aes(x=REG_DATE,y=DATA, colour=DAY,group=DAY))+
//facet_wrap=plot이 만들어지는 단위 기준
 geom_line()+facet_wrap(~NAME,ncol = 1, scales="free")+
 coord_cartesian(ylim=c(1,150))+
 scale_x_discrete(breaks= c("03:00","06:00","09:00","12:00","15:00","18:00","21:00"))

- group :  한 장비의 yesterday, today 별로 그래프를 그리고 싶어서 group을 주었음

- facet_wrap : 장비 NAME 별로 그래프를 따로 그리기 위해 facet_wrap 사용

- ncol : 열의 갯수 

- scales :  x 축 라벨이 각  행마다 다 들어가려면 free

- coord_cartesian : y축 범위 설정

- scale_x_discrete : x축 라벨 표시 간격 설정


ncol = 1 옵션 넣은 것 

ncol = 1 옵션 안 넣은 것 


scales = "free" 넣은것 

scales = "free" 안 넣은것 


scale_x_discrete 사용 안 한 것

미친자처럼 x축 라벨이 다 달리는 바람에 겹쳐서 선이 되어버림 ㄹㅇ 멸망

scale_x_discrete 사용 한 것

으음~깰끔~


5. 파일로 저장하기

###### pdf 열기 ######
pdf("example.pdf")
###### 그래프 그리기 ######
ggplot(MergeTsv,aes(x=REG_DATE,y=DATA, colour=DAY,group=DAY))+geom_line()+facet_wrap(~NAME,ncol = 1)
###### 닫기 ######
dev.off()

이렇게 하면 pdf로 저장됨

혹은

ggsave(file=pdfname,plot=all_plot,height=5, units="in", limitsize = FALSE)


그래프 그리기 연습하면서 참고한 블로그 

*  merge 내용 참고


R - 기본함수 - rbind / cbind / merge

R에서 데이터를 결합하는 함수로는 rbind, cbind, merge 세가지가 있습니다. 1. rbind데이터프레인 df1과 ...

blog.naver.com


* facet_wrap과 ncol 참고


R ggplot2 집단간 비교를 위한 면 분할(facet, Trellis) : facet_grid(), facet_wrap()

그룹(집단, 요인) 간의 데이터 분포 형태, 변화 추이 등을 비교 분석하기에 유용한 방법으로 비교하려는 축을 기준으로 면을 분할하여 그래프를 그룹 간 비교하는 방법이 있습니다. Lattice 패키지

rfriend.tistory.com

* x축 표시 참고


위키독스

온라인 책을 제작 공유하는 플랫폼 서비스

wikidocs.net

* 아래 오류 참고

geom_path: Each group consists of only one observation. Do you need to adjust the group aesthetic?


ggplot2 tips – 숨은원리 데이터사이언스: R로 하는 데이터 사이언스


ds.sumeun.org


반응형
반응형

netstat 조회 결과 중 pid 값을  taskkill 명령어에 써먹는 batch파일을 만들려고 함


1. netstat 명령어 실행 -> 결과 중 3148 을 변수에 저장하려고 함 

C:\Users>netstat -ano | findstr 8080
  TCP    0.0.0.0:8080           0.0.0.0:0              LISTENING       3148
  TCP    [::]:8080              [::]:0                 LISTENING       3148


2.  변수에 3148을 대입하는 명령어

1) %a 변수에 netstat 결과 중 3148을 넣는다

2) result 변수에 %a를 대입한다

for  /f  "tokens=5  delims=  "  %a  IN  ('netstat  -ano  ^|  findstr 8080'do  set  result=%a
tokens : 결과에서 몇 번째를 저장할 지 설정
delims : 구분자

    "tokens=5 delims= "  :  공백을 구분자로 다섯번째 문자열을 선택(3148)

%a : 임시로 쓸 변수
result : 명령어 저장할 변수
in ( ) : 실행할 명령어를 넣는다.
do() : 앞의 명령어 실행 후 실행할 내용
* 명령어에 ' | ' 나 ' ( ' 같은 특문이 있으면 앞에 ^를 붙일 것
* 변수 세팅시 ( set 변수=%a) 공백 없도록
* batch파일에 적을 때에는 %a에 %를 하나 더 붙인다 


cmd에 실행한 예시

netstat 결과가 두줄이라 그런지... set result가 두 번 실행됨..

C:\Users\heirr>for /f "tokens=5 delims= " %a IN ('netstat -ano ^| findstr 8080') do set result=%a

C:\Users\heirr>set result=3148

C:\Users\heirr>set result=3148

C:\Users\heirr>echo %result%
3148


반응형

batch 파일 내용(test.bat)

//batch 파일을 관리자로 실행하기 위해 넣었음
if not "%1"=="am_admin" (powershell start -verb runas '%0' am_admin & exit /b)

cd ../

for /f "tokens=5 delims= " %%a IN ('netstat -ano ^| findstr 8080') do set result=%%a

//result 변수를 taskkill 명령어에 사용
taskkill /f /pid %result%

//batch 파일로 실행한 cmd가 자동종료되지 않게 하기 위함
cmd /k


반응형
반응형


1. github > repositories 에서 new 를 통해 repository를 하나 생성한다.


생성이 되면 URI를 복사해둔다.


2. 이클립스에서

Window > Perspective > Open Perspective > Other > Git

> Clone a Git Repository

아까 복사해둔 respository 주소를 붙여넣는다.


난 Branches가 없어서 아무것도 안 나옴.

이 부분은 정확히 뭔지 잘 모르겠음. Next


3. 로컬에서 코드를 저장할 디렉터리 경로를 넣는다.

로컬 repository에 소스가 commit되고 git에 올라가는 걸로 알고있음

git hub의 repository가 이클립스에 생겼다.

잎사귀를 눌러 작업중인 내 Spring 프로젝트가 있는 페이지로 돌아간다.


4. 프로젝트 이름 우클릭 > Team > Share Project

타입은 git 선택

repository 경로를 선택

완료가 되면 내 스프링 프로젝트 폴더에 ?가 붙은것이 보이는데 

5. 프로젝트 우클릭 > Team > Add to index , 이어서 Commit

add to index하면 ?가 사라짐

Commit을 누르면 아래 메뉴가 보이고 업로드 시 보일 메시지도 넣을 수 있음 

아래 메뉴는 이클립스에서 ctrl+shift+3 으로 호출 가능 


완료되면 Github의 Repository에 업로드 되어있는 걸 볼 수 있음 


반응형

+ Recent posts