반응형

redis 다운로드 / 설치


Release 3.2.100 · microsoftarchive/redis

This is the first release of Redis on Windows 3.2. This release is based on antirez/redis/3.2.1 plus some Windows specific fixes. It has passed all the standard tests but it hasn't been tested in a...

github.com


설치 완료가 되면 CMD창을 열어 다음 내용을 확인

C:\Program Files\Redis>netstat -an | findstr 6379
  TCP    127.0.0.1:6379         0.0.0.0:0              LISTENING


redis 설치 폴더로 이동하여 다음 실행

C:\Program Files\Redis>redis-cli
127.0.0.1:6379>


key - value 생성 테스트. 조회가 안 되는 경우 nil 을 반환한다.

127.0.0.1:6379> set testkey testvalue
OK

127.0.0.1:6379> get testkey
"testvalue"

127.0.0.1:6379> get geeee
(nil)

redis 툴 다운로드


P3X Redis UI | Apps | Electron

A very functional handy database GUI and works in your pocket on the responsive web or as a desktop app.

www.electronjs.org

>>P3X RedisUI를 사용이 불가한 것 같다.

아래 툴을 다운받으면 될듯 

https://redis.com/redis-enterprise/redis-insight/


RedisInsight | The Best Redis GUI

RedisInsight provides an intuitive and efficient graphical interface for Redis, allowing you to interact with your databases and manage your data.

redis.com

왼쪽의 download 버튼 클릭하여 설치 


설치가 완료되면 UI창이 뜬다.

ADD A CONNECTION 어쩌구를 눌러 연결을 추가한다.


NEW CONNECTION 선택


Name : 연결이름

Hostname : 연결 대상 주소 

Port : 기본은 6379

Username / Password : 있는 경우 입력 

입력 후 Add를 눌러 추가한다.


완료가 되면 Conenctions 목록에 생기는데 

왼쪽 아래에서 선택하여 연결을 해주자 


연결되면 CONNECTED 상태로 바뀜


왼쪽 상단의 툴바에서 Home으로 들어간다.


그럼 아까 설정한 key와 value가 보인다. 

반응형

'코딩 관련 > redis' 카테고리의 다른 글

Springboot redis 연동하기  (0) 2023.02.05
반응형

Spring Boot & Vue 환경에서 

API 호출에 실패했는데, Status Code를 보니 

431 Request Header Fields Too Large 이었다.


vue 폴더 밑의 vue.config.js 에서 proxy 설정을 제대로 안했음

proxy 경로를 백엔드 서버에서 사용하는 포트(8080)로 해놓아야 했음.

module.exports = {
  outputDir: "../src/main/resources/static",
  indexPath: "../static/index.html",
  devServer: {
    proxy: "http://localhost:8080"
  },
  chainWebpack: config => {
    const svgRule = config.module.rule("svg");
    svgRule.uses.clear();
    svgRule.use("vue-svg-loader").loader("vue-svg-loader");
  }
};

바꿔주고 npm run serve로 재시작하니 잘 된다.


431 오류 관련 참고

https://www.okta.com/identity-101/http-error-431/


HTTP Error 431: Definition, Status, Causes & Solutions | Okta

HTTP error 431 shows the status code request header fields too large. Learn how to correct the different issues that generate error 431.

www.okta.com


반응형
반응형

여우굴 쪽 한자동맹 본거지 입구

동굴에 있는데 열쇠가 없어서 문을 따고 들어갈 수 없다.

빙 돌아서 도적 야영지에 있는 동굴의 다른 입구로 들어가면 됨

반응형

'위쳐3' 카테고리의 다른 글

위쳐3 연금술사 펠러 위치  (0) 2021.09.26
반응형

룬스톤 & 수호부 도면 및 연금술 재료 상인

이그니 수호부 등등 샀당 


벨렌 -> 검은가지 북서쪽에 있음

반응형

'위쳐3' 카테고리의 다른 글

여우굴 한자동맹 본거지 입구  (0) 2021.09.26
반응형

부산김해 경전철을 타고 덕두역에서 내려서 걸어갔다 약 10분이 안 걸림. 주차장은 협소함.

왼쪽부터 물밀면곱배기, 내장국밥 맨 오른쪽은 맛보기 수육

온육수도 준다. 개맛있어...

국밥은 그냥 국밥맛이고

물밀면이 정말 맛있었다.

흔한 냉면 국물 맛이 아니었다. 면도 쫄깃하고 증말증말 맛있었다. 또먹고싶다.

맛보기 수육인데 양이 꽤 된다. 음 존맛

반응형
반응형

고등어회 먹고싶어서 갔다왔다.

도저히 알 수 없는 조합의 이름...

큰길 쪽에서 간판을 볼 수 있지만 입구는 여기가 아님

골목으로 드가면 입구가 있다. 주차장 없음.. 주변에 있는 공용주차장을 찾아가야 한다.

통제영주차장에 차를 댔다.

고등어회 정식 (2인) 먹었따.

사장님이 증말 친절하셨다.

위쪽 공기밥 + 멍게비빔밥 재료

왼쪽부터 멸치회 /  일반 회 / 고등어 회 / 고등어 구이 /  매운탕


고등어회 넘 맛있다.

왠지 엄청 싱싱한 느낌은 아니었음. 암튼 맛있따.

씹을수록 고소해


매운탕. 평범한 매운탕이다.


가게에 있는 화덕. 고등어를 저기서 구워서 나오는거 같은데 증말 맛있다.


멸치회. 밥에 슥슥 비벼서 먹으면 개꿀맛

반응형
반응형

Spring 환경에서 mybatis로 postgresql 연동하여 사용하는 환경.


수정 전 쿼리

 <select id="selectCount" parameterType="com.export.model.DataDto" resultType="Integer">
        SELECT COUNT(*)
        FROM ${tableName}
        WHERE ${dataTimeColumn} BETWEEN #{startTime} AND #{endTime}
</select>

where 절에 시간으로 조건을 줬는데... 에러가 났다.

Cause: org.postgresql.util.PSQLException: ERROR: operator does not exist: timestamp without time zone >= character varying

dataTimeColumn 컬럼은 timestamp 타입이라...

timestamp without time zone 타입이랑 character 타입이랑 연산이 안 된다는 것 같다.


해결방법 : TO_TIMESTAMP(문자열,'YYYY-MM-DD') 를 사용하여 문자열을 Date형식으로 변환해준다.


수정 후 쿼리

<select id="selectCount" parameterType="com.export.model.DataDto" resultType="Integer">
        SELECT COUNT(*)
        FROM ${tableName}
        WHERE ${dataTimeColumn} BETWEEN TO_TIMESTAMP(#{startTime},'YYYY-MM-DD') AND TO_TIMESTAMP(#{endTime},'YYYY-MM-DD')
</select>
반응형
반응형

Spring boot 환경에서 postgreSql DB를 연동하여 정보를 가져오려고 한다.


MyBatis 사용을 위한 설정 

- MyBatis 설정 <configuration></configuration >  : mybatis-config.xml 에서 설정함.

- SqlSessionFactory : DatabaseConfig.java 에서 설정함

- SQL 맵핑 <mapper></mapper> : dataMapper.xml에 쿼리문을 작성함 


1. 라이브러리

build.gradle에 의존성 추가

implementation "org.mybatis.spring.boot:mybatis-spring-boot-starter:1.3.1"
implementation "org.mybatis:mybatis-spring:1.3.1"
implementation "org.mybatis:mybatis:3.4.5"

implementation "org.postgresql:postgresql:9.4.1209.jre6"


2. mybatis 설정 파일 추가

resources > mybatis 밑에 mybatis-config.xml 생성

내용

<?xml version="1.0" encoding="UTF-8"?>
<!DOCTYPE configuration
        PUBLIC "-//mybatis.org//DTD Config 3.0//EN"
        "http://mybatis.org/dtd/mybatis-3-config.dtd">

<configuration>
    <settings>
        <setting name="jdbcTypeForNull" value="NULL" />
        <setting name="mapUnderscoreToCamelCase" value="true" />
    </settings>
</configuration>

jdbcTypeForNull : JDBC타입을 파라미터에 제공하지 않을때 null값을 처리한 JDBC타입을 명시한다. 일부 드라이버는 칼럼의 JDBC타입을 정의하도록 요구하지만 대부분은 NULL, VARCHAR 나 OTHER 처럼 일반적인 값을 사용해서 동작한다.

mapUnderscoreToCamelCase : 전통적인 데이터베이스 칼럼명 형태인 A_COLUMN을 CamelCase형태의 자바 프로퍼티명 형태인 aColumn으로 자동으로 매핑하도록 함


3.  jdbc datasource 설정

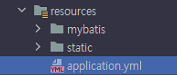
resources 밑에 application.yml 생성

내용

spring:
  profiles:
    active: local

---
# local development server
spring:
  profiles: local
  datasource:
    jdbc-url: jdbc:postgresql://localhost:5432/dbName
    driver-class-name: org.postgresql.Driver
    username: test
    password: test@!


4. DB 접속 및 sqlSession 설정

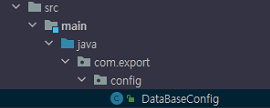
패키지 밑에 DataBaseConfig 생성

내용

package com.export.config;


import javax.sql.DataSource;

import org.apache.ibatis.session.SqlSessionFactory;
import org.mybatis.spring.SqlSessionFactoryBean;
import org.mybatis.spring.SqlSessionTemplate;
import org.mybatis.spring.annotation.MapperScan;
import org.springframework.beans.factory.annotation.Autowired;
import org.springframework.beans.factory.annotation.Qualifier;
import org.springframework.boot.context.properties.ConfigurationProperties;
import org.springframework.boot.jdbc.DataSourceBuilder;
import org.springframework.context.ApplicationContext;
import org.springframework.context.annotation.Bean;
import org.springframework.context.annotation.Configuration;
import org.springframework.context.annotation.Primary;
import org.springframework.jdbc.datasource.DataSourceTransactionManager;

@Configuration
//////매퍼 xml 파일이 바라볼 패키지 설정
@MapperScan(value="com.export.mapper.*", sqlSessionFactoryRef = "sqlSessionFactory")
public class DataBaseConfig {

	/////application.yml에 설정한 정보를 가져와 dataSource 빈 생성
    @Primary
    @Bean(name = "dataSource")
    @ConfigurationProperties(prefix = "spring.datasource")
    public DataSource dataSource() {
        return DataSourceBuilder.create().build();
    }


    @Primary
    @Bean(name = "sqlSessionFactory")
    public SqlSessionFactory sqlSessionFactoryBean(
            @Autowired @Qualifier("dataSource") DataSource dataSource,
            ApplicationContext applicationContext) throws Exception {
        SqlSessionFactoryBean factoryBean = new SqlSessionFactoryBean();
        factoryBean.setDataSource(dataSource);
        factoryBean
                .setConfigLocation(applicationContext.getResource("classpath:mybatis/mybatis-config.xml"));
        factoryBean
                .setMapperLocations(applicationContext.getResources("classpath:mybatis/mapper/*.xml"));
        return factoryBean.getObject();
    }

    @Primary
    @Bean(name = "sqlSession")
    public SqlSessionTemplate sqlSession(
            @Autowired @Qualifier("sqlSessionFactory") SqlSessionFactory sqlSessionFactory) {
        return new SqlSessionTemplate(sqlSessionFactory);
    }

    @Primary
    @Bean(name = "transactionManager")
    public DataSourceTransactionManager transactionManager(
            @Autowired @Qualifier("dataSource") DataSource dataSource) {
        return new DataSourceTransactionManager(dataSource);
    }


}


설정은 끝


매퍼 xml 파일 예시

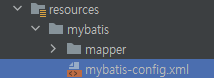
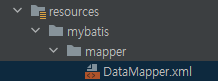
resources > mybatis > mapper 밑에 매퍼 xml 파일을 만들었다.

내용 예시 

<?xml version="1.0" encoding="UTF-8"?>
<!DOCTYPE mapper PUBLIC "-//mybatis.org//DTD Mapper 3.0//EN"
        "http://mybatis.org/dtd/mybatis-3-mapper.dtd">

<mapper namespace="com.export.mapper.DataMapper">
    <select id="select11" parameterType="DataDto" resultType="Integer">
        SELECT COUNT(*)
        FROM ${tableName}
        WHERE ${dataTimeColumn} BETWEEN TO_TIMESTAMP(#{startTime},'YYYY-MM-DD') AND TO_TIMESTAMP(#{endTime},'YYYY-MM-DD')
</select>


</mapper>
반응형
반응형

Spring Boot 환경에서 vue 설치하여 사용하기

IDE : intellij


1. Spring 프로젝트를 만들자


[SpringBoot] intellij 에서 Gradle을 포함한 SpringBoot 프로젝트 만들기

상단 메뉴바 File > New > Project Gradle, Java 선택, Next 프로젝트 이름이랑 경로 지정 프로젝트에서 build.gradle에서 의존성 설정 plugins { id 'org.springframework.boot' version '2.5.0' id 'io.sprin..

mchch.tistory.com


2. VUE CLI를 설치하자


[Vue] vue.js 설치/실행, 싱글파일 컴포넌트

1. Node.js 설치 다운로드 | Node.js Node.js® is a JavaScript runtime built on Chrome's V8 JavaScript engine. nodejs.org 2. VUE CLI 전역설치 > npm install -g @vue/cli -g : 로컬 어디에서든 vue-cli를..

mchch.tistory.com


3. vue 프로젝트를 만들자


터미널에서 입력한다. > vue create '프로젝트이름'

옵션들을 선택하게 된다.


프리셋 선택

Default 설치는 Router가 없다

Manually 설치는 Router를 설치할 수 있다.


Manually 설치를 선택하면 기능을 선택할 수 있다. 

방향키로 움직이고 스페이스로 선택. Router를 넣었당


버전선택


모드 선택

Vue는 기본적으로 Hash 모드이며, History 모드로 사용할 것인지 선택하게 된다.

Hash 모드는 url 뒤에 #이 붙는다. History모드는 url뒤에 #이 붙지 않는다. 

아직은 잘 모르니 n으로 가자..


Hash Mode와 History Mode 설명


[Vue] vue-router에서 Hash Mode Vs History Mode 차이점은 무엇인가?

들어가기 최근 Vue 를 사용하게 되면서 Hash Mode와 History Mode에 대해서 의문점을 가지게 되었습니다. Vue.js에 router 관련된 설정을 추가하면서 다음과 같은 설정에 직면하게 되었습니다. import Vue from

happy-coding-day.tistory.com


나머지 항목들도 잘 모르니 일단은 기본으로 선택했다.

완료되면 디렉토리가 생긴당.


4. 뷰 프로젝트 설정

뷰 디렉토리 밑에 vue.config.js 파일을 생성한다.


파일 내용

module.exports = {
  //outputDir : npm run build로 빌드 시에 파일이 생성되는 위치
  outputDir: "../src/main/resources/static",
  //indexPath : index.html 파일이 생성될 위치
  indexPath: "../static/index.html",
  //SpringBoot 서버 접속 주소
  devServer: {
    proxy: "http://localhost:8080"
  },
  chainWebpack: config => {
    const svgRule = config.module.rule("svg");
    svgRule.uses.clear();
    svgRule.use("vue-svg-loader").loader("vue-svg-loader");
  }
};


5. 빌드

터미널에서 vue 프로젝트 디렉토리로 이동한 뒤에

> npm run build 입력

완료되니 resources 밑에 index.html과 소스들이 생겼다.

안생겼으면 껐다가 다시 열기 


6. 실행

spring 을 실행하고 

터미널에서 >npm run serve 를 입력하고 나면 완료된다.


반응형
반응형

머 이런 값을 가진 Map 이 있다고하자

{a=1,b=2,c=null}


c라는 key로 접근 -> value가 null

d라는 key로 접근 -> key가 없어서 NullPointerException

map.get("c")  //null값 
map.get("d") //NullPointerException


get 대신에 getOrDefault를 사용하면 된다. key 뒤에는 null일 경우 사용할 디폴트값을 지정해준다.

map.getOrDefault("c","-999");
map.getOrDefault("d","-999");​
반응형

+ Recent posts